Table of Contents
- Introduction
- Selection and preparation of chicken for stir-fry
- Choosing the right vegetables for a flavorful dish
- Cooking techniques: Maintaining texture and flavor
- Enhancing taste with soy sauce and other seasonings
- Serving suggestions and complementary side dishes
- Tips for quick and efficient stir-frying at home
- Health benefits of chicken and vegetable stir-fry
- Common mistakes and how to avoid them
- Conclusion
- Frequently Asked Questions
Introduction
Sizzling Sensations: Mastering the Art of Chicken and Vegetable Stir-Fry
1 lb chicken breast, thinly sliced
2 cups mixed vegetables (bell peppers, broccoli, carrots)
3 tbsp soy sauce
2 tbsp sesame oil
1 tbsp cornstarch
3 cloves garlic, minced
1-inch piece of ginger, grated
Welcome to the exhilarating world of chicken and vegetable stir-fry, where the sizzle of the wok and the burst of vibrant colors create a culinary dance that excites the senses. Picture this: juicy chunks of chicken infused with savory soy and sesame flavors, nestled amidst a vibrant array of crisp-tender vegetables. This is more than just a meal; it’s an invitation to embark on a flavorful journey that combines simplicity with a dash of culinary artistry. As we dive into the secrets of perfecting this timeless dish, you’ll discover tips, techniques, and variations that will transform your stir-fry into a masterpiece of taste and texture. Whether you’re a seasoned chef or a kitchen novice, get ready to unleash your inner culinary artist, and let every bite tell a story of sizzling sensations.
Selection and preparation of chicken for stir-fry
When it comes to preparing chicken for a stir-fry, selecting the right type and ensuring proper preparation are crucial steps to achieve that perfect combination of flavor and texture. Most recipes recommend using boneless, skinless chicken breasts or thighs due to their ease of preparation and ability to cook quickly. Chicken thighs offer a richer flavor and stay juicier during cooking, while breasts provide a leaner option.
Once the chicken is selected, the next step is preparation. It’s important to slice the chicken evenly, ideally into thin strips, to ensure consistent cooking. Cutting against the grain can help keep the chicken tender. While sharp knives make the task easier, partially freezing the chicken for about 15 minutes can also aid in slicing.
To enhance the flavor, marinating the chicken is key. A simple marinade made from soy sauce, garlic, ginger, and a splash of sesame oil can infuse the chicken with rich, savory flavors. Allow the chicken to marinate for at least 15-30 minutes to ensure it absorbs the flavors effectively.
Choosing the right vegetables for a flavorful dish
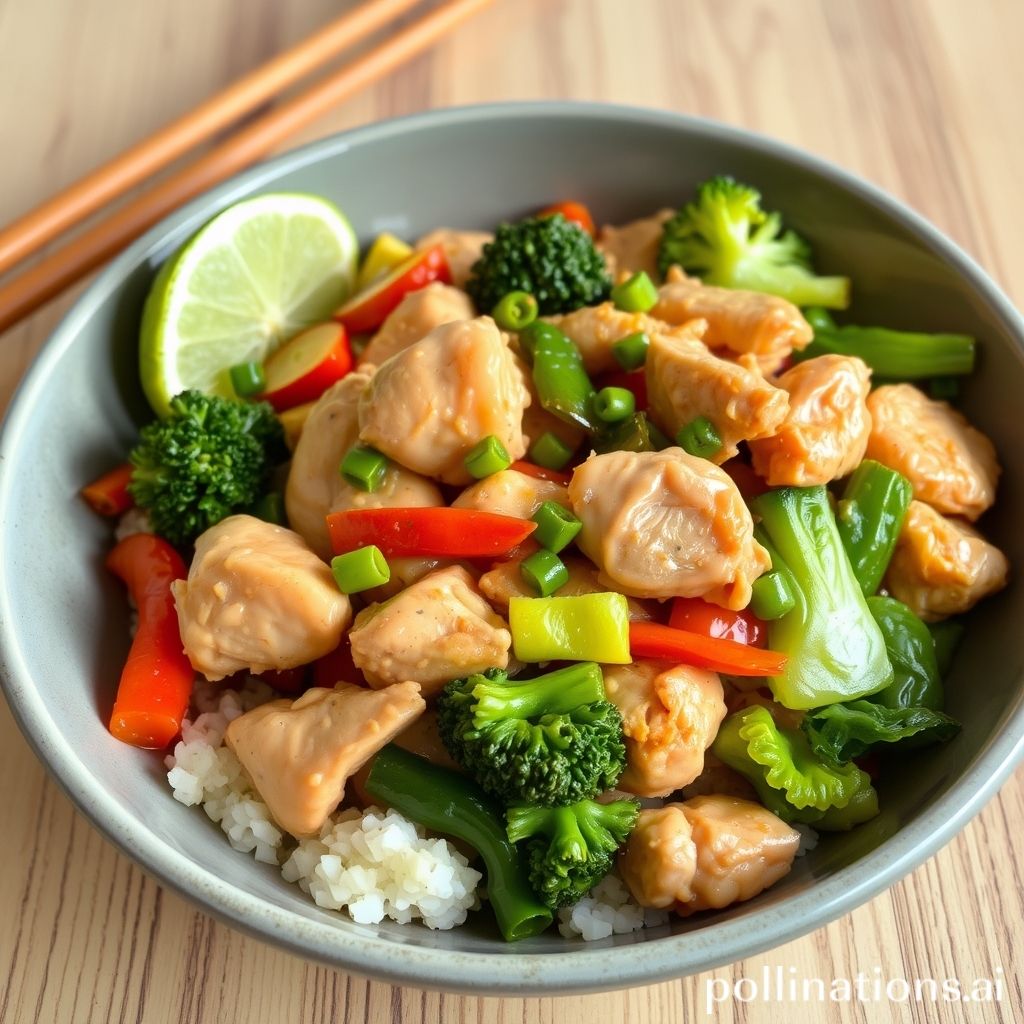
Choosing the right vegetables is key to creating a flavorful chicken and vegetable stir-fry. The ideal selection should offer a balance of texture, color, and taste. Crucial vegetables to consider include bell peppers, broccoli, carrots, and snap peas, which not only add vibrant colors but also maintain a satisfying crunch. These vegetables pair well with chicken and absorb the stir-fry sauce beautifully, enhancing the overall flavor of the dish.
Bell peppers, available in red, green, yellow, and orange, offer a natural sweetness and crispness, which contrast nicely with the savory notes of the chicken. Broccoli florets provide a firm texture and a subtle earthy flavor, which complements the aromatic ingredients like garlic and ginger. Carrots, when sliced into thin strips, cook quickly and introduce a hint of sweetness, adding depth to the dish without overpowering other flavors.
Adding snap peas or sugar snap peas brings a delightful crisp to each bite, while their mild flavor balances the more intense tastes of other ingredients. For an additional crunchy texture, consider including water chestnuts or baby corn. When selecting vegetables, freshness is key, as it preserves the flavor and nutritional value, making your stir-fry not only delicious but also healthy. Experimenting with different combinations can lead to discovering new flavors and textures that enhance this dish further.
Cooking techniques: Maintaining texture and flavor
Cooking a perfect chicken and vegetable stir-fry requires precision to ensure both texture and flavor are maintained. One of the key techniques to achieve this is by stir-frying over high heat. High heat allows for a quick cooking process, which helps preserve the natural flavors of the ingredients while also maintaining the crunch of the vegetables. Another essential tip is to prepare all your ingredients before you start cooking. This means having your vegetables chopped and chicken sliced into uniform pieces so they cook evenly. Additionally, keeping the vegetables slightly undercooked can help retain their vibrant colors and crunchy texture, adding a delightful contrast to your dish.
Using the right oil is also crucial for flavor. Oils with high smoke points, like peanut or canola, are ideal as they can withstand high temperatures without burning, adding a subtle nuttiness to the stir-fry. Don’t forget to season your chicken and vegetables at the right moment. Adding soy sauce, oyster sauce, or a splash of sesame oil toward the end of cooking ensures that the flavors penetrate without becoming overpowering. Stir-frying is about balance, so these careful considerations will help you create a delicious, well-textured dish every time.
Enhancing taste with soy sauce and other seasonings
Enhancing the taste of a chicken and vegetable stir-fry can transform a simple dish into a culinary delight, and soy sauce plays a pivotal role in this transformation. Known for its rich umami flavor, soy sauce adds depth and complexity to stir-fries. A splash of soy sauce not only seasons the chicken and vegetables but also ties together all the flavors in the dish. For a more balanced taste, consider using a combination of light and dark soy sauce. While light soy sauce imparts a salty edge, dark soy sauce adds sweetness and color.
Beyond soy sauce, other seasonings can also enhance the taste profile of your stir-fry. Garlic and ginger are classic additions that introduce aromatic notes and a slight heat. Adding a teaspoon of sesame oil at the end can elevate the dish with its nutty essence. For a hint of spice, a dash of chili flakes or a drizzle of sriracha can be included. Additionally, a sprinkle of fresh chopped herbs like cilantro or green onions just before serving can brighten the dish’s flavors.
Ultimately, the right balance of these seasonings can elevate your stir-fry, making it a memorable meal for any occasion.
Serving suggestions and complementary side dishes
When it comes to serving chicken and vegetable stir-fry, the dish pairs wonderfully with a variety of accompaniments that enhance its flavors and add balance to the meal. A classic choice is steamed jasmine or basmati rice, which provides a neutral backdrop that allows the vibrant flavors of the stir-fry to shine. For a healthier option, consider serving your stir-fry with quinoa or brown rice, adding a nutty texture and additional nutrients.
Another popular serving suggestion is to pair the stir-fry with rice noodles or stir-fried noodles, which can absorb the savory sauce beautifully, offering a delightful texture contrast. To complement the dish further, consider adding a simple side of crisp greens, such as a mixed leaf salad drizzled with a light sesame dressing, which adds a refreshing element to the meal.
If you’re aiming for a more substantial feast, egg rolls or spring rolls filled with vegetables make an excellent accompaniment, providing a crunchy contrast to the tender stir-fried chicken and vegetables. Finally, a bowl of miso soup or hot and sour soup can round out the meal, offering warm, savory comfort that complements the flavors of the stir-fry perfectly.
Tips for quick and efficient stir-frying at home
When it comes to creating a quick and efficient stir-fry at home, preparation is key. Begin by collecting all your ingredients and tools. Pre-cutting vegetables and chicken into uniform pieces ensures even cooking and a harmonious blend of flavors. Opt for thin slices to achieve that perfect stir-fry texture.
A high-quality wok or a large skillet is essential. These tools enable even heat distribution and allow ingredients to be tossed easily. Preheat your wok until it’s almost smoking; this helps to sear the chicken and vegetables quickly, locking in their natural flavors and nutrients.
The choice of oil is also crucial. Choose oils with a high smoke point such as vegetable, canola, or peanut oil, as these allow you to cook at high temperatures without burning.
Cooking in batches is another tip for efficiency. Overcrowding the wok can lead to steaming rather than frying, which affects the dish’s texture. Cook your protein first, followed by denser vegetables like carrots, finishing with softer vegetables like bell peppers.
Finally, have your sauce and seasonings ready to add at the last moment for a burst of flavor, creating a delicious meal in mere minutes.
Health benefits of chicken and vegetable stir-fry
Chicken and vegetable stir-fry is not only a delicious meal but also boasts numerous health benefits, making it an excellent choice for a balanced diet. At the core of its nutritional value is lean protein from chicken, which is essential for muscle building and repair, as well as promoting healthy skin and hair. Additionally, chicken is a rich source of B vitamins, crucial for energy metabolism and brain health.
Moreover, the variety of vegetables included, such as bell peppers, broccoli, and carrots, provides a wealth of vitamins and minerals. Vegetables are high in dietary fiber, which is important for maintaining digestive health and preventing chronic diseases. They also deliver antioxidants that combat free radicals, reducing inflammation and the risk of certain diseases.
Stir-frying, as a cooking method, uses little oil, which helps to retain the nutrients in the ingredients and keeps the meal low in calories. This makes chicken and vegetable stir-fry a heart-healthy option that supports weight management. Its rich composition of macro and micronutrients makes it a meal suited for both health enthusiasts and those seeking to enjoy flavorful cuisine.
Common mistakes and how to avoid them
When preparing a chicken and vegetable stir-fry, one common mistake is overcrowding the pan. This can lead to steaming rather than frying, resulting in a soggy texture. To avoid this, ensure you’re using a large enough pan or wok and cook in batches if necessary.
Another pitfall is not prepping ingredients before cooking. Stir-frying is a quick process, so it’s crucial to have all vegetables, chicken, and sauces ready to go before you start. Pre-chop vegetables into uniform sizes to ensure even cooking.
Overcooking the chicken is also a frequent error, leaving it dry and less flavorful. To prevent this, slice the chicken thinly and cook it separately until it just turns golden before adding it back to the pan with vegetables.
Using too much oil can weigh down your stir-fry, making it greasy. A small amount is usually sufficient as long as you continuously stir during cooking.
Finally, failing to season properly can create a bland dish. Besides soy sauce, consider using fresh garlic, ginger, or a splash of lemon juice to enhance the flavors. Paying attention to these details can lead to a perfectly balanced and delicious stir-fry every time.
Conclusion
Mastering the art of chicken and vegetable stir-fry opens up a world of culinary delights that are both delicious and healthy. By focusing on selecting the freshest ingredients, mastering the essential cooking techniques, and adding your personal touch with diverse seasonings, you can transform a simple stir-fry into a gourmet experience. Whether you’re an experienced home cook or a beginner, these tips and insights ensure that your stir-fry retains maximum flavor, texture, and nutrition every time. As a delightful meal that complements various sides, chicken and vegetable stir-fry is an adaptable dish perfect for any occasion. For those looking to expand their chicken culinary repertoire, ‘The Chicken Bible: Say Goodbye to Boring Chicken with 500 Recipes for Easy Dinners, Braises, Wings, Stir-Fries, and So Much More’, is an invaluable resource. Dive into 500 tantalizing recipes that promise to elevate your cooking prowess. Say goodbye to mundane meals and embrace the variety and flavor offered by this comprehensive guide. Take the next step in your culinary journey and explore all the possibilities chicken has to offer!